生成客户端
由于 FastAPI 基于 OpenAPI 规范,您可以自动兼容许多工具,包括自动 API 文档(由 Swagger UI 提供)。
一个并非那么明显的特定优势是,您可以为您的 API 生成客户端(有时称为 SDK),支持多种不同的编程语言。
OpenAPI 客户端生成器
有许多工具可以从 OpenAPI 生成客户端。
一个常用工具是 OpenAPI Generator。
如果您正在构建前端,一个非常有趣的替代方案是 openapi-ts。
客户端和 SDK 生成器 - 赞助商
还有一些由公司支持的基于 OpenAPI (FastAPI) 的客户端和 SDK 生成器,在某些情况下,它们可以在高质量生成的 SDK/客户端基础上为您提供附加功能。
其中一些还✨ 赞助 FastAPI ✨,这确保了 FastAPI 及其生态系统的持续健康发展。
这也显示了他们对 FastAPI 及其社区(您)的真正承诺,因为他们不仅希望为您提供优质服务,还希望确保您拥有一个良好健康的框架,FastAPI。🙇
例如,您可能想尝试:
还有其他几家公司提供类似服务,您可以在网上搜索并找到。🤓
生成 TypeScript 前端客户端
让我们从一个简单的 FastAPI 应用程序开始
from fastapi import FastAPI
from pydantic import BaseModel

app = FastAPI()


class Item(BaseModel):
    name: str
    price: float


class ResponseMessage(BaseModel):
    message: str


@app.post("/items/", response_model=ResponseMessage)
async def create_item(item: Item):
    return {"message": "item received"}


@app.get("/items/", response_model=list[Item])
async def get_items():
    return [
        {"name": "Plumbus", "price": 3},
        {"name": "Portal Gun", "price": 9001},
    ]
🤓 其他版本和变体
from typing import List

from fastapi import FastAPI
from pydantic import BaseModel

app = FastAPI()


class Item(BaseModel):
    name: str
    price: float


class ResponseMessage(BaseModel):
    message: str


@app.post("/items/", response_model=ResponseMessage)
async def create_item(item: Item):
    return {"message": "item received"}


@app.get("/items/", response_model=List[Item])
async def get_items():
    return [
        {"name": "Plumbus", "price": 3},
        {"name": "Portal Gun", "price": 9001},
    ]
请注意,这些*路径操作*使用模型 `Item` 和 `ResponseMessage` 定义了它们用于请求负载和响应负载的模型。
API 文档
如果您查看 API 文档,您会看到它包含了请求中发送和响应中接收数据的模式
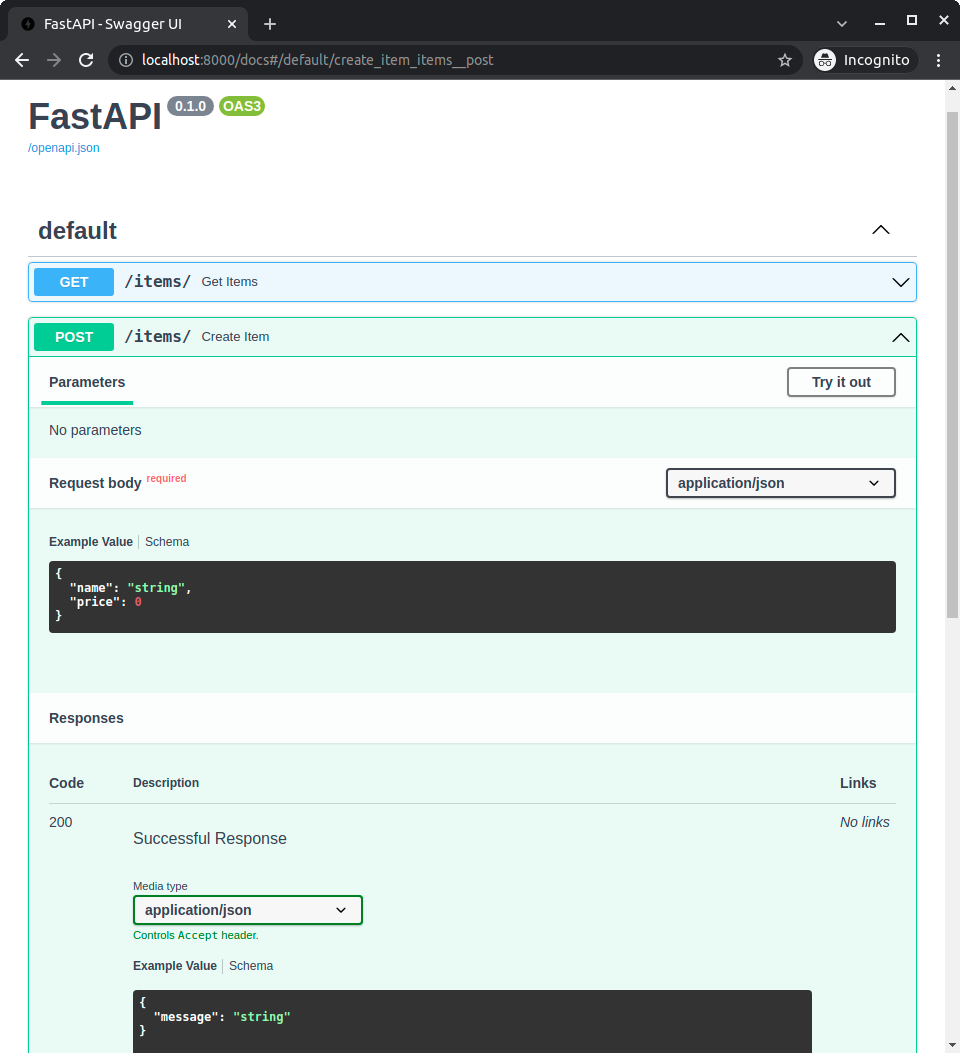
您可以看到这些模式,因为它们已在应用程序中与模型一起声明。
该信息在应用程序的 OpenAPI 架构中可用,然后显示在 API 文档中(由 Swagger UI 提供)。
而 OpenAPI 中包含的那些来自模型的信息,正是可以用于生成客户端代码的信息。
生成 TypeScript 客户端
现在我们有了带模型的应用程序,我们可以为前端生成客户端代码。
安装 openapi-ts
您可以使用以下命令在前端代码中安装 openapi-ts:
$ npm install @hey-api/openapi-ts --save-dev

---> 100%
生成客户端代码
要生成客户端代码,您可以使用现在已安装的命令行应用程序 openapi-ts。
因为它是安装在本地项目中的,您可能无法直接调用该命令,而是将其放在您的 package.json 文件中。
它可能看起来像这样
{
  "name": "frontend-app",
  "version": "1.0.0",
  "description": "",
  "main": "index.js",
  "scripts": {
    "generate-client": "openapi-ts --input https://:8000/openapi.json --output ./src/client --client axios"
  },
  "author": "",
  "license": "",
  "devDependencies": {
    "@hey-api/openapi-ts": "^0.27.38",
    "typescript": "^4.6.2"
  }
}
在有了 NPM 的 `generate-client` 脚本后,您可以通过以下命令运行它
$ npm run generate-client

frontend-app@1.0.0 generate-client /home/user/code/frontend-app
> openapi-ts --input https://:8000/openapi.json --output ./src/client --client axios
该命令将在 ./src/client 中生成代码,并将内部使用 axios(前端 HTTP 库)。
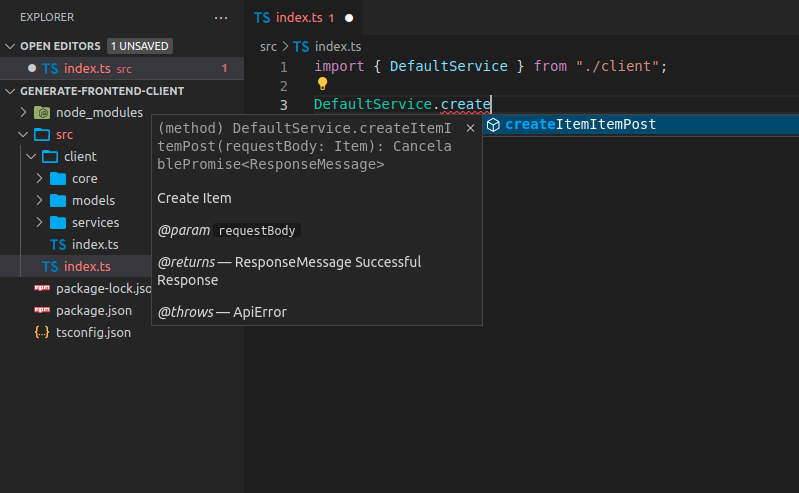
试用客户端代码
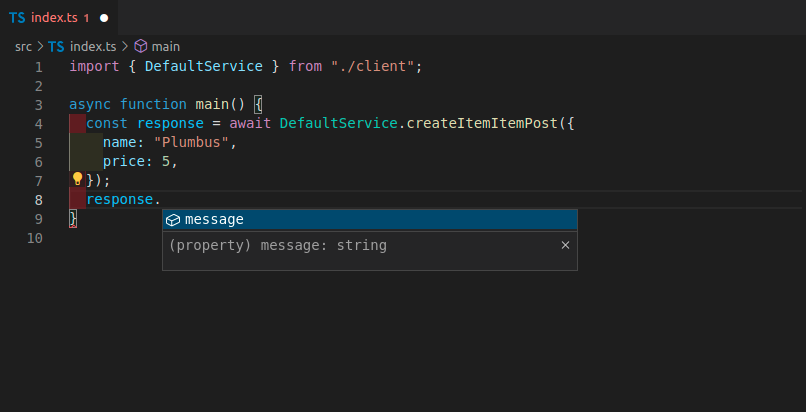
现在你可以导入并使用客户端代码了,它可能看起来像这样,请注意你可以获得方法的自动补全
您还将获得要发送的有效载荷的自动补全
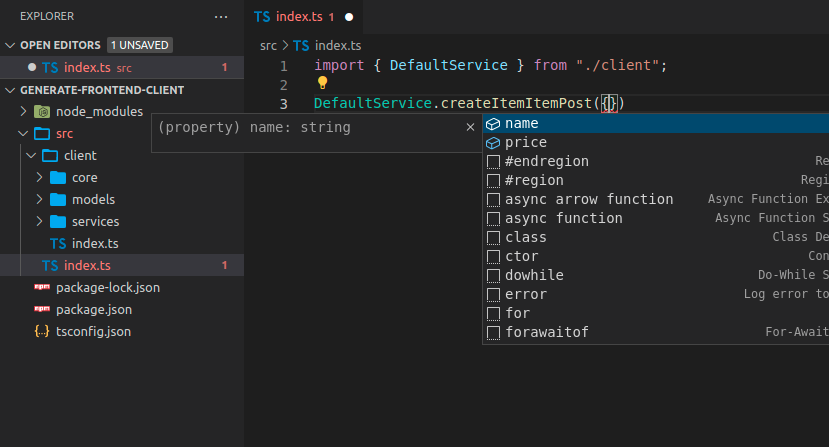
提示
请注意 name 和 price 的自动补全,这在 FastAPI 应用程序的 Item 模型中定义。
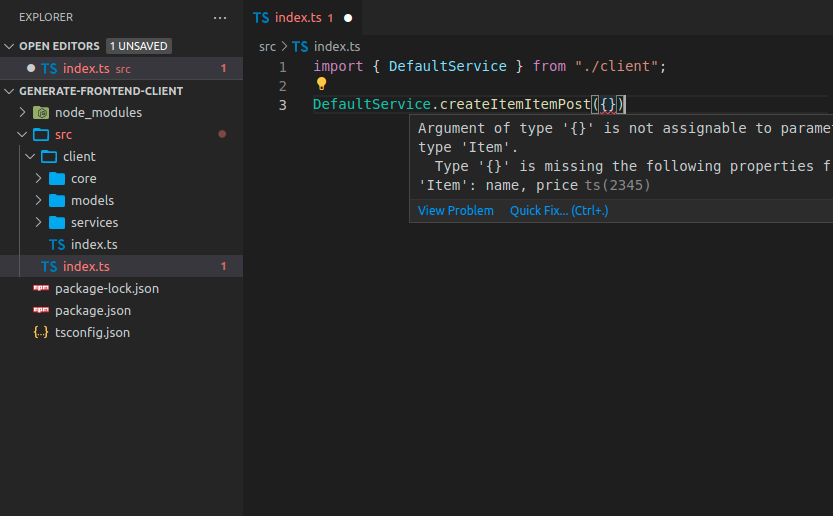
您将收到所发送数据的内联错误
响应对象也将具有自动补全功能
带标签的 FastAPI 应用
在许多情况下,您的 FastAPI 应用程序会更大,您可能会使用标签来分离不同组的*路径操作*。
例如,您可以有一个用于物品的部分和另一个用于用户的部分,它们可以通过标签进行分离
from fastapi import FastAPI
from pydantic import BaseModel

app = FastAPI()


class Item(BaseModel):
    name: str
    price: float


class ResponseMessage(BaseModel):
    message: str


class User(BaseModel):
    username: str
    email: str


@app.post("/items/", response_model=ResponseMessage, tags=["items"])
async def create_item(item: Item):
    return {"message": "Item received"}


@app.get("/items/", response_model=list[Item], tags=["items"])
async def get_items():
    return [
        {"name": "Plumbus", "price": 3},
        {"name": "Portal Gun", "price": 9001},
    ]


@app.post("/users/", response_model=ResponseMessage, tags=["users"])
async def create_user(user: User):
    return {"message": "User received"}
🤓 其他版本和变体
from typing import List

from fastapi import FastAPI
from pydantic import BaseModel

app = FastAPI()


class Item(BaseModel):
    name: str
    price: float


class ResponseMessage(BaseModel):
    message: str


class User(BaseModel):
    username: str
    email: str


@app.post("/items/", response_model=ResponseMessage, tags=["items"])
async def create_item(item: Item):
    return {"message": "Item received"}


@app.get("/items/", response_model=List[Item], tags=["items"])
async def get_items():
    return [
        {"name": "Plumbus", "price": 3},
        {"name": "Portal Gun", "price": 9001},
    ]


@app.post("/users/", response_model=ResponseMessage, tags=["users"])
async def create_user(user: User):
    return {"message": "User received"}
生成带标签的 TypeScript 客户端
如果您为使用标签的 FastAPI 应用生成客户端,它通常也会根据标签分离客户端代码。
这样,您就能为客户端代码正确地排序和分组

在这种情况下,你有
ItemsServiceUsersService
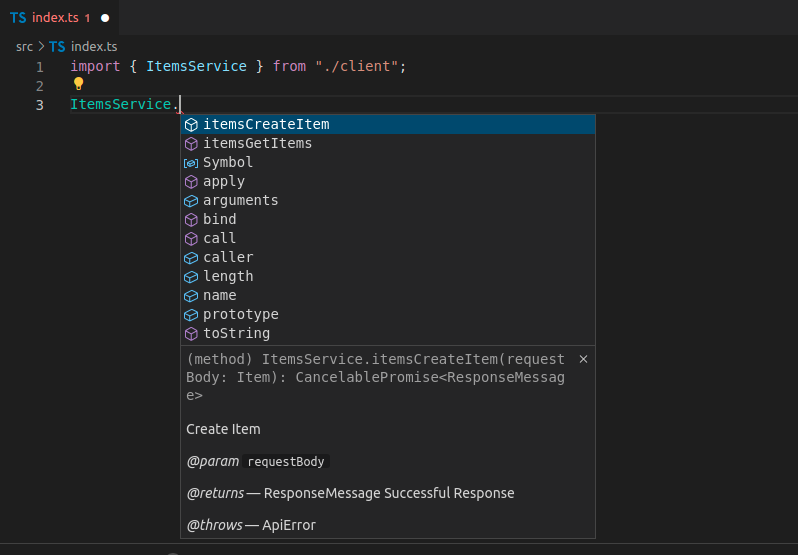
客户端方法名称
现在生成的诸如 `createItemItemsPost` 之类的方法名称看起来不太整洁
ItemsService.createItemItemsPost({name: "Plumbus", price: 5})
……那是因为客户端生成器使用每个*路径操作*的 OpenAPI 内部操作 ID。
OpenAPI 要求每个操作 ID 在所有*路径操作*中都是唯一的,因此 FastAPI 使用函数名、路径和 HTTP 方法/操作来生成该操作 ID,因为这样可以确保操作 ID 的唯一性。
但我接下来会向你展示如何改进这一点。🤓
自定义操作 ID 和更好的方法名称
您可以修改这些操作 ID 的生成方式,使其更简单,并在客户端中拥有更简单的方法名称。
在这种情况下,您需要以其他方式确保每个操作 ID 是唯一的。
例如,您可以确保每个*路径操作*都带有一个标签,然后根据标签和*路径操作*的名称(函数名称)生成操作 ID。
自定义生成唯一 ID 函数
FastAPI 为每个*路径操作*使用一个唯一 ID,它用于操作 ID,也用于任何所需自定义模型(用于请求或响应)的名称。
你可以自定义这个函数。它接受一个 APIRoute 并输出一个字符串。
例如,这里它使用第一个标签(你可能只有一个标签)和*路径操作*名称(函数名称)。
然后你可以将这个自定义函数作为 generate_unique_id_function 参数传递给 FastAPI
from fastapi import FastAPI
from fastapi.routing import APIRoute
from pydantic import BaseModel


def custom_generate_unique_id(route: APIRoute):
    return f"{route.tags[0]}-{route.name}"


app = FastAPI(generate_unique_id_function=custom_generate_unique_id)


class Item(BaseModel):
    name: str
    price: float


class ResponseMessage(BaseModel):
    message: str


class User(BaseModel):
    username: str
    email: str


@app.post("/items/", response_model=ResponseMessage, tags=["items"])
async def create_item(item: Item):
    return {"message": "Item received"}


@app.get("/items/", response_model=list[Item], tags=["items"])
async def get_items():
    return [
        {"name": "Plumbus", "price": 3},
        {"name": "Portal Gun", "price": 9001},
    ]


@app.post("/users/", response_model=ResponseMessage, tags=["users"])
async def create_user(user: User):
    return {"message": "User received"}
🤓 其他版本和变体
from typing import List

from fastapi import FastAPI
from fastapi.routing import APIRoute
from pydantic import BaseModel


def custom_generate_unique_id(route: APIRoute):
    return f"{route.tags[0]}-{route.name}"


app = FastAPI(generate_unique_id_function=custom_generate_unique_id)


class Item(BaseModel):
    name: str
    price: float


class ResponseMessage(BaseModel):
    message: str


class User(BaseModel):
    username: str
    email: str


@app.post("/items/", response_model=ResponseMessage, tags=["items"])
async def create_item(item: Item):
    return {"message": "Item received"}


@app.get("/items/", response_model=List[Item], tags=["items"])
async def get_items():
    return [
        {"name": "Plumbus", "price": 3},
        {"name": "Portal Gun", "price": 9001},
    ]


@app.post("/users/", response_model=ResponseMessage, tags=["users"])
async def create_user(user: User):
    return {"message": "User received"}
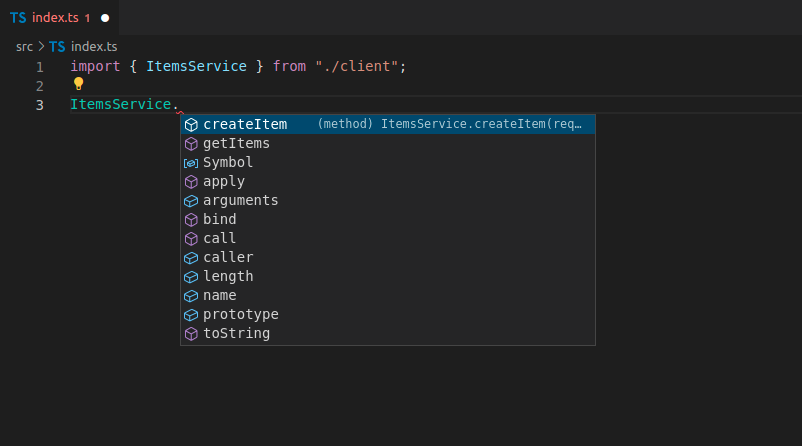
生成带自定义操作 ID 的 TypeScript 客户端
现在,如果你再次生成客户端,你会看到它有了改进的方法名称
如您所见,方法名称现在包含标签和函数名,不再包含 URL 路径和 HTTP 操作的信息。
为客户端生成器预处理 OpenAPI 规范
生成的代码中仍然存在一些重复信息。
我们已经知道这个方法与物品相关,因为 `ItemsService`(来自标签)中包含了这个词,但方法名称中仍然带有标签名前缀。😕
我们可能仍希望将其保留在 OpenAPI 中,因为这能确保操作 ID 是唯一的。
但是对于生成的客户端,我们可以在生成客户端之前修改OpenAPI 操作 ID,仅仅是为了让这些方法名称更简洁、更清晰。
我们可以将 OpenAPI JSON 下载到一个文件 `openapi.json` 中,然后我们可以用像下面这样的脚本移除前缀标签
import json
from pathlib import Path

file_path = Path("./openapi.json")
openapi_content = json.loads(file_path.read_text())

for path_data in openapi_content["paths"].values():
    for operation in path_data.values():
        tag = operation["tags"][0]
        operation_id = operation["operationId"]
        to_remove = f"{tag}-"
        new_operation_id = operation_id[len(to_remove) :]
        operation["operationId"] = new_operation_id

file_path.write_text(json.dumps(openapi_content))
import * as fs from 'fs'

async function modifyOpenAPIFile(filePath) {
  try {
    const data = await fs.promises.readFile(filePath)
    const openapiContent = JSON.parse(data)

    const paths = openapiContent.paths
    for (const pathKey of Object.keys(paths)) {
      const pathData = paths[pathKey]
      for (const method of Object.keys(pathData)) {
        const operation = pathData[method]
        if (operation.tags && operation.tags.length > 0) {
          const tag = operation.tags[0]
          const operationId = operation.operationId
          const toRemove = `${tag}-`
          if (operationId.startsWith(toRemove)) {
            const newOperationId = operationId.substring(toRemove.length)
            operation.operationId = newOperationId
          }
        }
      }
    }

    await fs.promises.writeFile(
      filePath,
      JSON.stringify(openapiContent, null, 2),
    )
    console.log('File successfully modified')
  } catch (err) {
    console.error('Error:', err)
  }
}

const filePath = './openapi.json'
modifyOpenAPIFile(filePath)
这样,操作 ID 将从诸如 items-get_items 之类的名称重命名为仅 get_items,从而使客户端生成器能够生成更简单的方法名称。
生成带预处理 OpenAPI 的 TypeScript 客户端
现在,由于最终结果在文件 openapi.json 中,您将修改 package.json 以使用该本地文件,例如
{
  "name": "frontend-app",
  "version": "1.0.0",
  "description": "",
  "main": "index.js",
  "scripts": {
    "generate-client": "openapi-ts --input ./openapi.json --output ./src/client --client axios"
  },
  "author": "",
  "license": "",
  "devDependencies": {
    "@hey-api/openapi-ts": "^0.27.38",
    "typescript": "^4.6.2"
  }
}
生成新的客户端后,您将拥有简洁的方法名称,并且带有所有自动补全、内联错误等功能
优点
使用自动生成的客户端,您将获得以下内容的自动补全:
- 方法。
- 请求体中的载荷、查询参数等。
- 响应载荷。
您还将获得所有内容的内联错误。
每当您更新后端代码并重新生成前端时,任何新的*路径操作*都将作为方法可用,旧的将被移除,并且任何其他更改都将反映在生成的代码中。🤓
这也意味着如果发生任何变化,它将自动反映在客户端代码中。而且如果您构建客户端,如果数据使用有任何不匹配,它将报错。
因此,您将在开发周期的早期就发现许多错误,而不必等待错误在生产环境中向最终用户显示出来,然后再尝试调试问题所在。✨